LEARNING AIM A: UNDERSTAND THE TECHNIQUES AND APPLICATIONS OF EDITING FOR FILM AND TELEVISION
Editing Techniques Video Essay
Tables Used For Script of video
|
|
|
LEARNING AIM B: EXPLORE THE USE OF EDITING TOOLS, TECHNIQUES, AND CONVENTIONS FOR A SPECIFIED PURPOSE
The purpose of editing the music video and the mockumentary was to give me the opportunity to put the techniques that I had studied in assignment A into practice and use them confidently in order to ensure that a suitable final product was created to be shown across media platforms, such as TV and Internet. This project allowed me experiment with editing techniques by using a range of tools on Final Cut Pro software in order to achieve the appropriate conventions for the given genre.
Throughout these projects I experimented with editing techniques I wasn't extremely confident in using and had not used before, such as: Split screen, Slow-motion, Zoom, Cropping, Effects (black and white), Freeze-frame.
Throughout these projects I experimented with editing techniques I wasn't extremely confident in using and had not used before, such as: Split screen, Slow-motion, Zoom, Cropping, Effects (black and white), Freeze-frame.
MUSIC VIDEO
Purpose of Music Video
The purpose of the music video was to create a two minute video that consisted of various editing techniques suitable for the given genre, indie/pop in order to interest the correct target audience.
Editing a music video was challenging, as I had to experiment with a range of advanced editing techniques as well as experiment with pacing – I also learned different functions effectively in Final Cut Pro such as using markers to mark the beat. I was given a range of pre recorded music video clips, it was my responsibility to select the clips that I wished to use in my final video.
Editing a music video was challenging, as I had to experiment with a range of advanced editing techniques as well as experiment with pacing – I also learned different functions effectively in Final Cut Pro such as using markers to mark the beat. I was given a range of pre recorded music video clips, it was my responsibility to select the clips that I wished to use in my final video.
Codes & Conventions Inspiration for Music Video
Initial Ideas for Music Video editing
My initial idea for the music video was to tell the story between the past and the present. I wanted to make the story clips black and white and leave the clips of the band in colour, to distinguish different time periods. I knew that I wanted to use split-screen to demonstrate how the different time periods were linked in some way.
Final Idea
For the beginning of my final video I used scale to slowly expand the clip to simplify the start of the video and allow the clip to take up the full screen -- and the scale changed on the beat. At the end of the video I did the opposite to signify the end and to keep symmetry. I experimented more with split-screen, at first I was only using an original two-way split-screen, however in my final video I expanded to a six way spilt screen. In addition I combined split-screen with freeze-frame to show all the different aspects of the band and allow the audience to process each clip in on its own. I also included several fast clips to keep the audience engaged and I included this at the same point every time to keep rhythm.
Storyboard
Storyboard 2 by Tallulah on Scribd
MUSIC VIDEO: FINAL CUT
Editing Log of Decisions
MOCKUMENTARY
Research into Genre
The Purpose of Mockumentary
I have analysed the brief and I understand that I am going to use this project to explore the uses of continuity and non-continuity editing techniques. In my music video editing I used a lot of examples of non-continuity editing because this is conventional of the genre e.g. jump cuts and montage.
The Mockumentary allowed me to experiment with editing the narrative and to explore how editing affects the narrative and creates comedy for the audience. It was my responsibility to create the Mockumentary from start to finish. This included arranging cast, writing the script, all filming and editing.
For this project I am going to work with Kayleigh to film and edit a 2 minute mockumentary style sit-com similar to The Office or Parks and Recreation. We both really enjoy this genre and think it will challenge us to use a range of editing techniques.
Initial Ideas for a Mockumentary sit-com
Idea 1:
Idea 2:
We’re considering this idea as it adds satire humour to the mockumentary genre. It includes most of the conventions of the genre. We chose this storyline as it challenges the typical conventions as it uses a different location. It is mildly inspired by Borat, as it follows one person.
Idea 3:
We have chosen to use this idea, as it is filmed in a school setting, which is conventional and accessible. We will be able to incorporate the conventions of this genre. Equipment is supplied, and will be filmed with a hand held camera. Characters and themes are typical. This idea is inspired by the mockumentary sitcom shows, The Office and Parks and Recreation.
- Set in a staff room.
- Staff talking about students and their subjects.
- Two teachers have a disagreement.
- One teacher interviewed (in the style of The Office)
Idea 2:
- Chavy mum arguing with super market manager, as she was caught stealing.
- Interview with her saying how out of order the security was.
- She gets arrested for stealing.
We’re considering this idea as it adds satire humour to the mockumentary genre. It includes most of the conventions of the genre. We chose this storyline as it challenges the typical conventions as it uses a different location. It is mildly inspired by Borat, as it follows one person.
Idea 3:
- Students in detention with a horrible supply teacher.
- Students are bored, but then hear the teacher yell at someone from outside.
- Teacher makes inappropriate jokes. Students do not find him funny. Angers the supply teacher.
- Students begin to miss their old teacher (flashbacks).
- Eventually they are able to leave. Split screen of the students walking away and the teacher moaning about them.
We have chosen to use this idea, as it is filmed in a school setting, which is conventional and accessible. We will be able to incorporate the conventions of this genre. Equipment is supplied, and will be filmed with a hand held camera. Characters and themes are typical. This idea is inspired by the mockumentary sitcom shows, The Office and Parks and Recreation.
Chosen Idea and how it meets codes & Conventions
We chose to study the mockumentary genre as it contrasts with the music video as the editing is more simplistic and mockumentaries are heavily controlled by the narrative. We chose to select this genre as we could create an idea that was close to our reality, meaning it was relatable. Furthermore, the editing helps to create comedy.
Environment – We chose to set our mockumentary in our school, which is our everyday working environment, making it conventional of the genre and appropriate for the narrative, as it is based in a lesson making it easier to capture the footage. We edited together several establishing shots at the beginning of the mockumentary, to show the environment of the classroom and reiterate the fact that the characters are bored.
Characters – We chose to base our narrative on an over-exaggerated supply teacher as this situation is relatable to most people, creating personality of the character and comedy for the audience. All of the student characters also had distinctive traits, for example the character Kayleigh was extremely shy. The level of extreme was different for each character in order to allow the character of Mr. Skinner to stand out. We edited supers to appear on screen when the character of Mr. Skinner reads out the students’ names. This was used to add comedy as he is pronouncing the names of the students wrong. We decided to place the shots of Miss McLeod in the flashback in a certain order to show a journey of her character – in the first shot she appears highly professional, she then begins to feel frustrated about being filmed, so we see a different, more unprofessional side of her character.
Camera Work – We only used one camera to replicate the style of the mockumentary. Some shake and zoom was present to ensure that the mockumentary felt natural and highlight the fact that the camera crew are present. We also included interview style shots with each of the characters through a close-up shot to create comedy. We used cutaway shots to cut to a different location or style, for example we constantly cut from the classroom to the interview setting. We also used jump cuts when the character of Kayleigh is being scared to show time passing and to highlight the fact that she is constantly being scared – jump cuts are quite sudden, matching the emotion of Kayleigh.
Canned Laughter / Sound Effects – We decided not to use canned laughter during editing in order to reiterate the idea that the mockumentaries are supposed to reflect reality, and to keep the natural feel of the genre. Minimal sound effects were used in editing to again make the mockumentary seem natural. We used a swear censor to beep out swear words in order to make the content appropriate, as well as adding comedy and giving the audience the freedom to imagine what was said (we also added a visual blur edit to cover the character’s mouth).
Enhancements – Lighting and colour was minimalistic in order to highlight that the mockumentary was part of reality. No gels and filters were used to enhance the mockumentary in any way. We did not change the brightness, saturation, colour balance or use filters in the editing process to position the audience with the characters. However, we used splitscreen in the title sequence where we had half the screen showing the character and the other half showing their name to allow the audience to establish the characters before watching the mockumentary. We used a fade edit to introduce the flashback of Miss McLeod, this was used to show a contrast between the two teachers. We then edited the rolling credits – we chose to have them running over the end of the film as it is conventional to the genre. For the audience, this ensures that they end the film laughing, and also encourages them to watch the credits. We then created a production logo and place it at the end.
Final Developed Idea
Screenplay
Shotlist
Storyboard

Mockumentary Comedy: Final Edit
Editing Log of Decisions
LEARNING AIM C: CREATE A DIGITALLY EDITED SEQUENCE FOR A SPECIFIED PURPOSE
Project
My final project will be to create a short six minute film that it of the horror genre. I will need to include codes and conventions of the genre to ensure that it is clear to an audience.
Available Resources
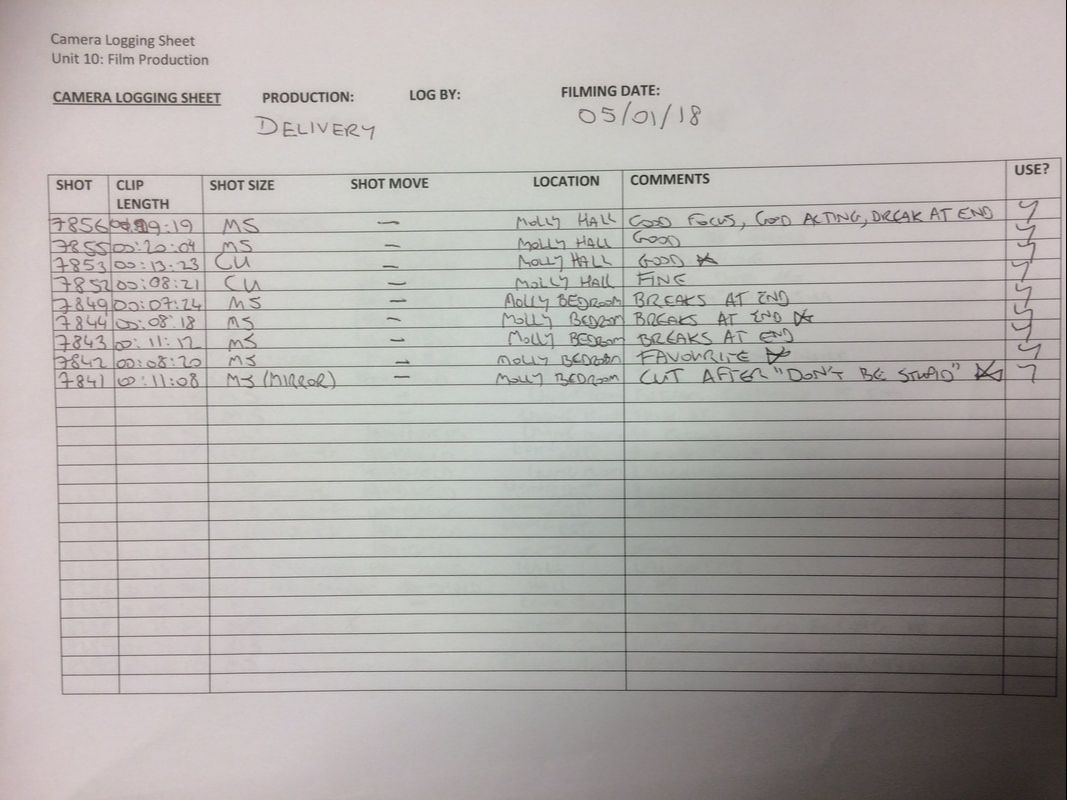
Production Logs
Evaluation of Test Sequences
Sequence Idea
Horror Movie Idea Final by Melissa on Scribd
Screenplay
Shotlist
Storyboard
Rushes


Schedule
Shooting Schedule Complete by Challoner Media on Scribd
Edit Decision List
Screenshot Of Imported files

First Draft
Reflection On First Draft
Screenshot Of Film Being Exported

Evidence Of Files Saved Correctly


Final Film Questionnaire Analysis
Below is evidence of the questionnaire I conducted

Once I was satisfied with the finished product I allowed a group of Media studies students to watch my film then complete a questionnaire. Overall I received positive feedback, with 95% of those surveyed sating that they either strongly agreed or agreed that my film genre was clear, that tension was created throughout the film and that the film was an overall success.
The majority of the people who took part in the questionnaire stated that they felt the editing techniques I chose to use helped to build tension. For example, the use of slow paced editing and cross cutting appeared to be the most effective techniques. Coincidentally, the use of slowed paced editing was also the most preferred technique that the participants of the questionnaire believed to be the most effective. In addition the use of long takes and cut away techniques were also among the most preferred techniques used to convey the codes and conventions of the horror genre.
From these findings it is clear that most people stated that they felt that I could improve my film by attempting to create a more complex narrative and possibly including a flashback in order to provide the audience with a deeper insight into the characters. According to the results another way I could improve this project is to use jump cuts in order to build more tension.
Overall, the majority of people who took part in the questionnaire said that they felt that my film project was a success. This means that I was able to successfully convey the appropriate codes and convention of my chosen genre in order to keep my target audience interested.
Final Evaluation of Editing Techniques used
I used a range of diegetic sounds which I sourced through Final Cut and YouTube. These sounds helped to create a sense of realism for the audience. For example, I used the sound of a kettle boiling to enhance the tense atmosphere. I also used the recurring sound of the phone ringing to reflect how the character begins to become more threatened by what is considered to be a normal occurrence. The use of the diegetic sound of ‘Scream’ playing throughout the movie heightens the tense moments – for example, the moment where the main character is walking towards the door the audio in ‘Scream’ mirrors her fear. The use of the killer’s dialogue allows us to empathise, to put ourselves in the main character’s shoes. The non-diegetic sound of the soundtrack that plays both at the beginning and at the end of the film helps to set up the genre and at the end brings the movie to a close through symmetry.
Apart from just continuity, editing was used to increase the dramatic effect for the audience and to set up the narrative. For example, cross-cutting used between the two main characters, which I cleverly used to mislead the audience into thinking that Lucy was the victim. However at the last moment of the film the audience find out that she was a red herring and Molly is the real victim, cross-cutting constantly hints to the audience that Molly has involvement in the end result before it is demise actually revealed. I used a range of long takes when the main character is being followed to slow the editing pace, increasing the anticipation and to put us in the character’s shoes. At the point where the main character is opening the door I cut to the most dramatic moment in ‘Scream’ to emphasise the fear. The fact that at the end of the film I use a smash to black is another traditional horror convention and is intended to make the audience jump and allows the audience to imagine the outcome of Molly’s death which encourages the audience play an active role and can sometimes be more effect than them actually viewing the action. My final editing choices were to use a letterbox to make it appear more professional. Also In terms of colour I added a blue tone effect over the top of each clip to represent the cold and terrifying atmosphere, instantly causing the audience to feel a strong sense of unease.
The editing techniques I chose to use were effective as they helped to reinforce the genre of the production as well as helping to add meaning to the narrative of the film. As a result of this my film would have a greater impact on an audience as they would feel a connection with the narrative and the characters.
Overall I think my production was a success as it effectively demonstrated the codes and conventions of the sub-genre home invasion – however, I was also able to be more creative with some of my narrative structure to add unexpected moments for the audience.
